

- 1. Introduction: Why Sealing Gaps at Roof Eaves is Crucial
- 2. Step-by-Step Guide to Sealing Gaps at Roof Eaves
- 3. Essential Tools for Sealing Roof Eaves
- 4. Common Mistakes to Avoid When Sealing Gaps
- 5. Long-Term Pest Prevention Tips for Roof Eaves
- 6. Conclusion: Keeping Your Home Pest-Free with Proper Roof Care
1. Introduction: Why Sealing Gaps at Roof Eaves is Crucial
Roof eaves are a common entry point for pests like rodents, birds, insects, and other wildlife that can invade your home. Gaps or cracks at the roofline, even small ones, provide easy access for these pests to nest or enter your attic. Once inside, they can cause significant damage to insulation, wiring, and the structural integrity of your roof. Sealing these gaps is one of the most effective ways to prevent pest infestations and maintain a safe, clean environment in your home.
This article will guide you through the process of sealing gaps at roof eaves and provide essential tips to keep pests at bay. We'll also discuss common mistakes homeowners make and how to avoid them to ensure long-lasting protection.
Environ Pest Elimination
SpringfieldSangamon CountyIllinois
1720 E Spruce St, Springfield, IL 62703, USA
2. Step-by-Step Guide to Sealing Gaps at Roof Eaves
Sealing gaps at roof eaves can be done effectively with a few simple tools and materials. Here's how to tackle the task:
- Step 1: Inspect the Roof Eaves
Begin by thoroughly inspecting your roof eaves. Look for cracks, gaps, or spaces between the roof and the fascia board. Pay close attention to the corners and around vents or chimneys where gaps are more likely to form.
- Step 2: Clean the Area
Before sealing, clean the area around the gaps. Use a broom or a vacuum to remove debris like leaves, dirt, or dust. A clean surface will ensure that the sealant adheres properly and provides a stronger barrier.
- Step 3: Apply the Sealant
For small gaps, use a high-quality caulk or silicone sealant. Apply the sealant into the gaps using a caulking gun. Smooth it out with a putty knife to ensure a clean, even seal. For larger openings, consider using foam spray or weatherproofing strips to fill the space.
- Step 4: Install Screens or Vent Covers (Optional)
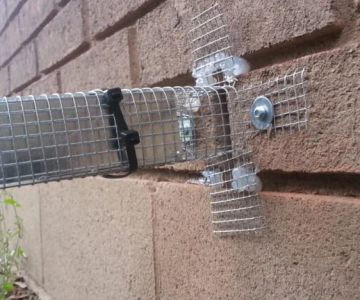
If you have vents or openings at the eaves, install fine mesh screens or vent covers to further block pests. These will allow airflow but prevent insects and rodents from entering your home.
- Step 5: Allow the Sealant to Dry
Let the sealant dry and cure as per the manufacturer’s instructions. This typically takes about 24 hours. Make sure the area is undisturbed during this time to ensure a solid seal.
3. Essential Tools for Sealing Roof Eaves
Having the right tools will make sealing roof eaves a much easier and more efficient process. Here’s what you’ll need:
- Caulking Gun: A must-have tool for applying sealant smoothly and evenly.
- High-Quality Caulk or Silicone Sealant: Ensure you choose a weather-resistant, long-lasting option for sealing gaps.
- Foam Spray: Ideal for larger gaps that require filling with a solid barrier.
- Putty Knife: Used to smooth out the caulk for a neat, professional-looking finish.
- Wire Mesh or Vent Screens: These are great for covering vents and preventing pests from entering through air openings.
- Safety Equipment: Gloves, safety goggles, and a mask to protect yourself during the sealing process, especially when using spray foam or caulking products.
4. Common Mistakes to Avoid When Sealing Gaps
While sealing gaps at roof eaves is a simple process, there are common mistakes that can undermine the effectiveness of your efforts. Avoid the following errors:
- Skipping the Inspection: Neglecting to inspect the entire roofline for gaps or cracks can result in missed areas that continue to let pests in.
- Using the Wrong Sealant: Not all sealants are designed for outdoor use. Make sure you choose a product that’s durable, weather-resistant, and suitable for exterior applications.
- Overfilling the Gaps: While it's important to seal the gaps, using too much caulk or foam can make the area look messy and may not adhere as well. Apply a thin, even layer.
- Ignoring Ventilation: When sealing vents, make sure you’re not completely blocking airflow. Opt for vent covers or mesh that allow ventilation but block pests.
5. Long-Term Pest Prevention Tips for Roof Eaves
Sealing gaps at roof eaves is just one step in an ongoing effort to keep pests away. Here are additional long-term pest prevention tips:
- Regular Inspections: Inspect your roof and eaves annually to ensure no new gaps have formed and the existing seals are still intact.
- Trim Overhanging Trees: Branches that touch your roof can offer easy access for pests like squirrels and insects. Keep branches trimmed and away from the roofline.
- Use Pest Repellents: Consider using natural or chemical repellents to deter rodents and insects from nesting around your eaves.
- Ensure Proper Drainage: Clogged gutters or downspouts can lead to water damage, which in turn can create entry points for pests. Keep gutters clean and free-flowing to reduce the risk of infestations.
6. Conclusion: Keeping Your Home Pest-Free with Proper Roof Care
By sealing gaps at roof eaves, you’re taking an essential step to prevent pests from invading your home. This simple yet effective task will keep your attic safe, your roof in good condition, and your living space free of unwanted critters. Remember to inspect regularly, choose the right materials, and avoid common mistakes to ensure long-term success.
For more tips on pest control and roof maintenance, visit PestControlHub for the best products and expert advice.


 Pestban Inc4.0 (394 reviews)
 GreenShield Home & Pest Solutions - Richmond5.0 (121 reviews)
 Orkin4.0 (1313 reviews)
 Joe Terrone4.0 (42 reviews)
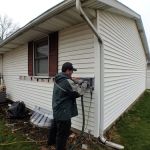 Home Environment Solutions5.0 (57 reviews)
 Ehrlich Pest Control4.0 (18 reviews)
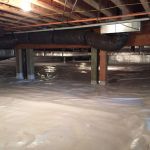 How to Keep Crawlspaces Ventilated & Pest-Free
 How to Stop Fruit Flies from Taking Over Your Kitchen
 The Cost of Pest Control: What You Should Expect to Pay
 How to Prevent Pest Spread Between Units in Apartments: Essential Tips for Apartment Residents
 How to Use Low-Toxic Sprays Safely: A Complete Guide
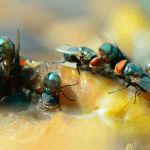 How to Keep Flies Out of Your House in the Summer – Effective Tips