
How to Seal Entry Points Around Piping
- Why Sealing Entry Points Matters
- Common Locations to Inspect
- Choosing the Right Sealing Materials
- Step-by-Step Guide to Sealing Around Pipes
- Real-Life Example: Effective Sealing in Action
- Protect Your Home with PestControlHub
1. Why Sealing Entry Points Matters
Gaps around pipes might look harmless, but they’re one of the most common ways pests, moisture, and drafts invade your home. Whether it’s a small crack in the foundation or a loose pipe fitting under your sink, these tiny openings can lead to big problems—mold growth, energy loss, and pest infestations. Sealing entry points around piping is one of the simplest yet most effective ways to maintain a clean, energy-efficient, and pest-free home.
In many U.S. homes, especially those built before 2000, these gaps often go unnoticed during regular maintenance. The result? Rodents, insects, and even snakes find easy access points indoors. Preventing this early can save homeowners hundreds of dollars in repairs and pest control treatments.
Beitzel's Spraying
LancasterLancaster CountyPennsylvania
685 Hartman Station Rd, Lancaster, PA 17601, USA
2. Common Locations to Inspect
Before sealing, it’s essential to identify where these gaps usually occur. Here are a few key areas you should always check:
1. Exterior walls and foundations: Openings where water or gas pipes enter the home are major entry points for pests and moisture.
2. Under sinks and behind toilets: Plumbing joints often have small spaces that can expand over time.
3. Attics and crawl spaces: HVAC lines and drain pipes that pass through these areas are often left unsealed.
4. Laundry rooms and basements: Dryer vents and drain lines can leave gaps that attract insects and rodents.
Using a flashlight and mirror, inspect hard-to-reach corners or gaps around caulked areas. Any spot where light or air passes through should be addressed immediately.

3. Choosing the Right Sealing Materials
Selecting the correct material is critical for long-lasting results. Each sealing method serves a unique purpose depending on the pipe type and surrounding environment:
Silicone Caulk: Ideal for indoor use, especially around kitchen and bathroom fixtures, as it’s flexible and waterproof.
Expanding Foam: Best for filling large gaps around pipes that pass through walls or foundations. Be careful not to overfill, as foam expands significantly.
Hydraulic Cement: Perfect for basement or foundation cracks that need strong, water-resistant sealing.
Steel Wool or Copper Mesh: A must-have for pest control. Inserting these materials before caulking deters rodents and insects from chewing through the seal.
For the most durable results, many professionals use a combination of mesh filler and sealant, ensuring both physical and chemical protection against pests and moisture.
4. Step-by-Step Guide to Sealing Around Pipes
Here’s a simple, effective process to properly seal entry points around pipes:
Step 1: Clean the area. Remove dirt, debris, and old caulk from the surface around the pipe to ensure the sealant adheres properly.
Step 2: Measure the gap. Use a small ruler to determine the width of the opening—this will help you choose the correct sealing material.
Step 3: Apply filler (if needed). For large openings, insert steel wool or copper mesh before applying foam or sealant.
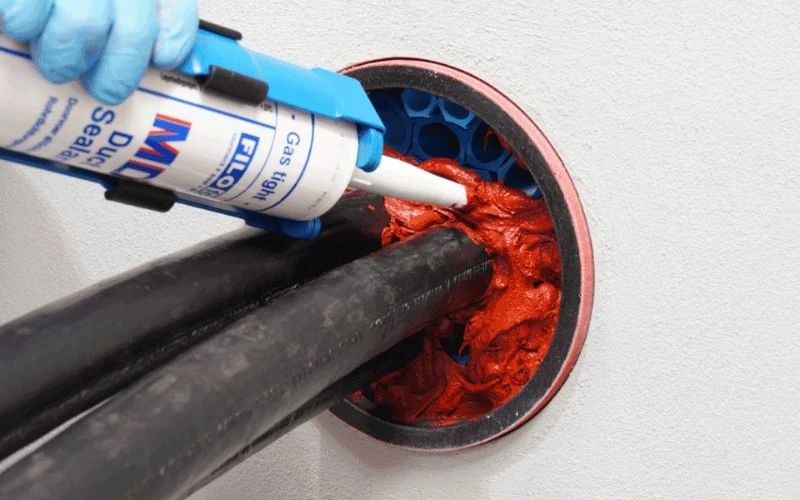
Step 4: Apply sealant. Use a caulking gun to apply a steady bead of silicone or foam around the pipe. Smooth it with a damp finger or tool for a clean finish.
Step 5: Inspect and maintain. Once dried, inspect for any missed gaps. Reapply or touch up as necessary to ensure a tight, professional seal.
This method works for both interior and exterior applications. For outdoor pipes, consider UV-resistant sealants to prevent cracking under sunlight.
5. Real-Life Example: Effective Sealing in Action
In Florida, one homeowner noticed ants repeatedly entering through their kitchen floor near a water line. After inspection, they discovered a half-inch gap around the pipe. By cleaning the area, inserting copper mesh, and applying a waterproof silicone sealant, the problem was eliminated completely. Six months later, no pests had returned, and moisture readings in the area were stable.
Another case in Arizona involved rodents entering through air conditioning condensate lines in the attic. Expanding foam and hardware cloth were used to reinforce these weak spots, saving the homeowner from costly insulation damage caused by nesting pests.
6. Protect Your Home with PestControlHub
If you’re looking for the right products or professional advice to seal entry points effectively, PestControlHub offers everything you need. From high-quality sealants and foams to pest-proof materials like copper mesh and steel wool, their curated selection ensures durability and peace of mind.
Whether you’re tackling a small DIY project or planning a full-home inspection, PestControlHub connects you with top-rated products and expert guidance to keep your home pest-free and energy efficient year-round.


 Mosquito Squad & Pest Control of Williamsburg4.0 (130 reviews)
 Pace Wildlife Solutions of CT3.0 (5 reviews)
 Michiana Pest Solutions5.0 (4 reviews)
 AAA Lawn Care, Inc.4.0 (193 reviews)
 Southern Wildlife and Bat Control4.0 (8 reviews)
 Critter Control of Dayton4.0 (144 reviews)
 DIY vs Professional Pest Control: Which One Saves You Money?
 How to Get Rid of Bed Bugs Without Poisoning Your Home: Safe and Effective Solutions
 How to Monitor Pest Trends Post Treatment: Tips for Ongoing Control
 How to Block Pest Entry Around Deck Joists: Effective Solutions
 How to Use Smart Sensors for Insect Detection: A Modern Approach
 Safe Pest Control Around Food Storage Areas – Tips for Effective and Safe Solutions